
Modular Wrought Iron Railing Installation Guide
This wrought iron railing installation guide explains a general ten-step assembly sequence using decorative balusters, railing components and compatible mounting accessories. Confirm the components, mounting conditions and project requirements before starting.
With a power drill, impact wrench, measuring tape, marker, and handheld cutting tool when necessary, customers can assemble their railing systems without extensive on-site metal fabrication.
The ten written steps below describe a general assembly sequence. The six-stage diagram and the installation photo sequence provide separate visual overviews; they do not correspond one-to-one with the written step numbers. Use the sequence and components appropriate to the confirmed railing design and supporting structure.
Plan the Components Before Installation
A decorative baluster or spindle fills part of a railing; a handrail is the rail a person holds. A railing panel combines infill within a larger section. These terms do not mean that posts, handrails, brackets and anchors are included with an individual decorative module.
For example, model 1K is sold as one individual component, with installation accessories excluded. Compare the supplied component list with the requirements of your complete railing design before ordering.
Individual Modules, DIY Kits and Complete Systems
Individual modules let you choose the decorative pattern separately from the rest of the assembly. A complete system or DIY railing kit should have a defined component list and compatible connections; the word “kit” alone does not establish what is supplied. A separately commissioned installation also needs an agreed scope for site measurement, preparation, fitting and final checks. Compare those scopes, not only the price of one decorative component.
Indoor Stairs, Outdoor Steps and Balconies
Indoor stair planning considers the stair slope, handrail position and how the pattern meets adjacent finishes. Outdoor steps and porch entrances also require a finish and connection design suited to their exposure and supporting structure. A balcony is a different layout from a sloping stair run: its edges, corners and support locations must be included in the project design. A product application name does not certify the completed installation.
Use the railing module catalogue to compare decorative designs, then confirm dimensions, material, coating, accessories and installation responsibilities in your quotation. Do not infer a material grade, load rating or coating life from an illustration.
Ten-Step Assembly Sequence
Step 1: Measuring and Marking Post Positions
Begin by measuring the staircase or installation area to determine the positions of the railing posts.
Use a measuring tape and marker to identify the planned mounting locations. Check the distance between posts, the stair slope, and the overall railing alignment.
Before drilling, confirm that the mounting surface and proposed anchor locations are suitable for the railing system.
Step 2: Fastening the Lower Rail Bracket
Position the lower rail bracket at the designated connection point near the base of the railing post.
Align the bracket with the planned angle of the lower rail and secure it using the compatible fasteners supplied or specified for the railing system.
Check the bracket position before fully tightening the connection.
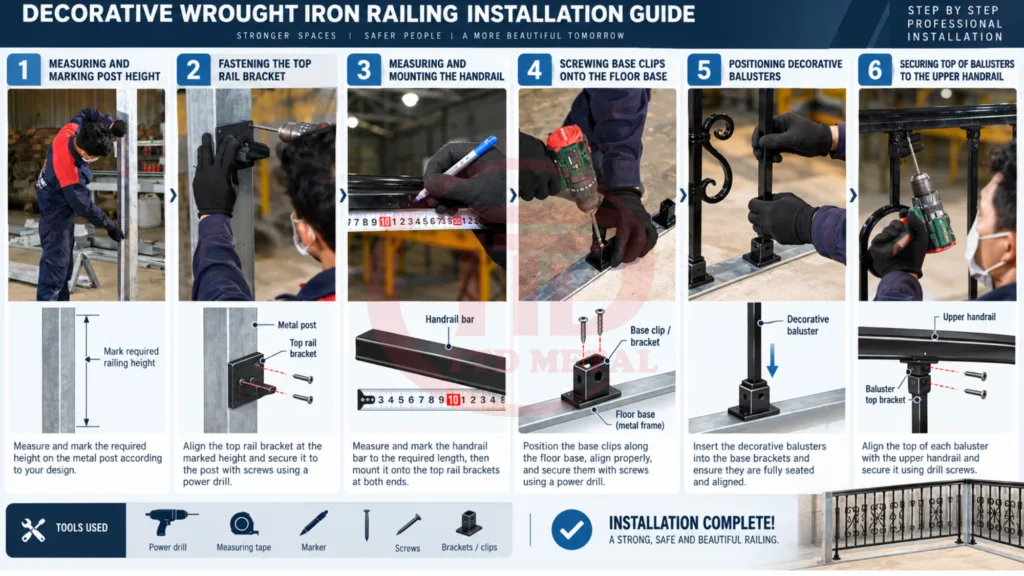
Step 3: Fastening the Upper Rail Bracket
Position the upper rail bracket at the corresponding connection point on the post.
Align the bracket with the staircase slope and the intended handrail position.
Secure the bracket using the appropriate fasteners, ensuring that the upper and lower mounting points are correctly aligned.
Step 4: Installing the Handrail Bar
Position the handrail bar between the prepared mounting brackets.
Check the handrail length, angle, and alignment with the staircase.
If length adjustment is required, use a suitable handheld cutting tool and follow the component manufacturer’s cutting and finish-protection requirements.
Connect the handrail to the brackets and verify that it is correctly positioned.
Step 5: Measuring and Marking Decorative Baluster Positions
Measure the available distance along the railing to determine the placement of the decorative balusters.
Mark the intended positions carefully, maintaining the spacing specified in the project layout.
Ensure that the decorative elements are arranged consistently and that the planned spacing meets applicable railing safety requirements.
Step 6: Installing Decorative Balusters
Position the first finished decorative baluster between the lower rail and upper handrail.
Align the baluster vertically and connect its lower mounting point using the compatible bracket or fastening component.
Check that the decorative pattern faces the correct direction and that the baluster is properly positioned before securing it.
Step 7: Securing the Top of Balusters to the Upper Handrail
Connect the upper end of the decorative baluster to the handrail using the designated mounting accessory.
Align the upper connection with the lower attachment point.
Tighten the fasteners using a suitable power drill or impact tool, following the applicable fastening requirements.
Avoid excessive tightening that could damage the components or protective finish.
Step 8: Repeating for Remaining Balusters
Repeat the positioning and fastening process for the remaining decorative balusters.
Maintain consistent spacing, vertical alignment, and decorative pattern orientation throughout the railing.
Inspect each connection as installation progresses.
Step 9: Tightening and Final Check
After all railing components are positioned, inspect the complete assembly.
Check the post connections, mounting brackets, handrail, decorative balusters, and fasteners.
Confirm that the components are correctly aligned and securely connected.
Inspect finished surfaces for installation damage and apply appropriate protective treatment to any exposed metal where necessary.
Do not place the railing into service until the installation has been checked against the applicable project and safety requirements.
Step 10: Installation Complete
Once the railing assembly has been installed and inspected, the modular wrought iron railing system is ready for its final project acceptance checks.
The completed system combines decorative wrought iron detailing with a modular installation approach, reducing the need for extensive on-site metal fabrication.
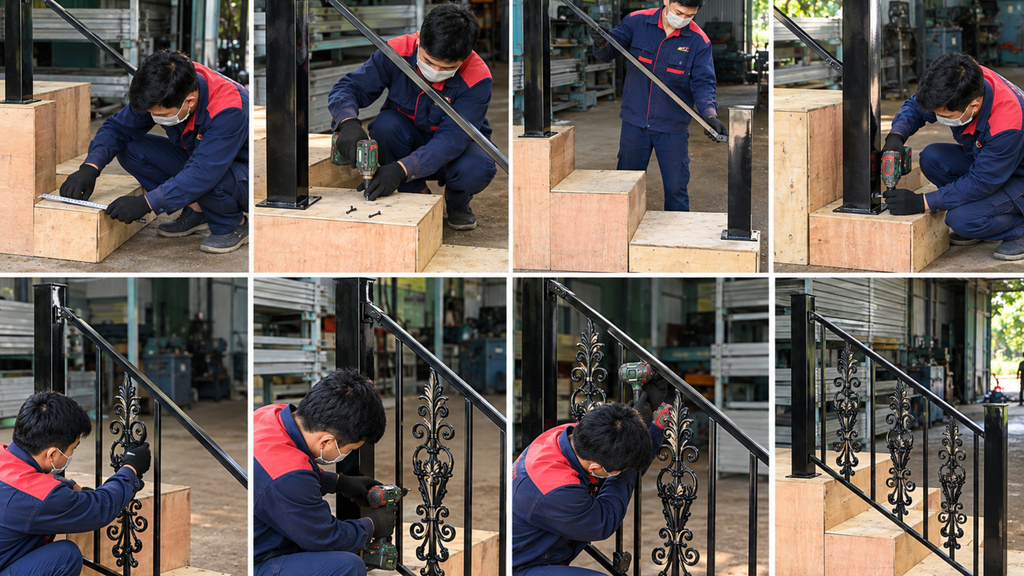
Tools and Installation Accessories
The installation process uses the following tools and components:
- Power drill
- Impact wrench or suitable fastening tool
- Measuring tape
- Marker
- Handheld cutting tool, when adjustments are required
- Compatible screws, bolts, brackets, and mounting clips
- Appropriate personal protective equipment
Use fasteners and mounting accessories suitable for the actual supporting structure and railing configuration.
Important Installation and Safety Information
This guide illustrates the general assembly sequence for TTD METAL modular railing systems.
Before installation, verify the dimensions, supporting structure, post anchorage, fastener suitability, and applicable local building requirements.
The illustrated installation sequence does not replace project-specific structural verification or any inspection required for staircases, balconies, and elevated areas.
Explore TTD METAL Railing Products
Browse our modular wrought iron railing products to explore available decorative designs and railing options.
For product specifications, compatible accessories, and installation-related questions, contact TTD METAL about your installation requirements before beginning your project.